How to create and customize Stickers with iOS 17
When emojis and Memojis fail to fully capture your emotions, Stickers will do the trick.
IF THERE'S ANY feature I use the most with iOS 17, it's Stickers. This feature builds on Visual Lookup in iOS 16, giving you the ability to cut and copy a subject from a photo, then paste it into a Messages conversation. Now you can turn those images into Stickers—complete with effects and animations. Creating Stickers is not only super fun (especially when you use your friends' funny photos), but it's also quick and easy. Below, we break down how to create and customize your own Stickers.
For a complete list of all the top features of Apple's latest operating system, be sure to check out our iOS 17 roundup.
Special offer for Gear readers: Get WIRED for just $5 ($25 off). This includes unlimited access to WIRED.com, full Gear coverage, and subscriber-only newsletters. Subscribing helps fund the work we do every day.
Choose your image
Open the Photos app on your iPhone or iPad and tap the photo you're looking for to make it full screen.
Press and hold the subject until you see a border appear around it.
On the pop-up menu, tap Animated Stickers. From there, it will automatically be added to the Stickers pane via the iPhone/iPad keyboard or Markup tools for future use.
If you only want to use this specific Sticker once (and don't want to save it to the Stickers drawer), you can also tap Share and send it via AirDrop, Messages, Mail, Notes, etc.
You can also turn Live Photos into Stickers by following the same steps. The only difference is that it will move automatically (depending on the Live Photo's movement). However, you can turn that feature off — which we explain below.
Pro Tip: If the photo has a lot of things in the background or around the subject you want to create Stickers for, we recommend cropping the photo or zooming in on the subject to make it easier to capture. Otherwise, your Stickers will include additional details that you may not want.
You also have the option to create Stickers in the Messages app. This method is a bit easier because it will automatically outline the subject for you.
- Open a text window in the Messages app.
- Tap the Emoji icon.
- Click on the Stickers icon.
- Tap the “+” sign in the left corner.
- Select the photo you want to create Stickers for and click on it.
- Click Add Stickers.
You can also access them by tapping the “+” icon to the left of the Messages text box. Then scroll through the app drawer until you find Stickers and tap on it.
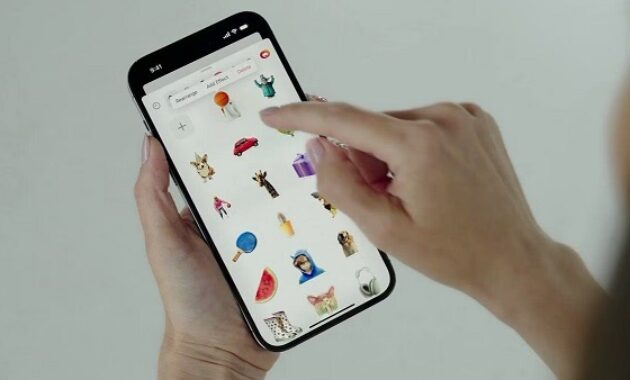
Customize Stickers
When adding new Stickers, you can also customize those Stickers with different effects.
- If you want to add an effect immediately after creating Stickers, tap Add Effect.
- If it is a Live Photo, you can turn off this feature so that the Sticker remains still.
- You will also have the option to choose filters including Outline, Puffy, Comic and Shiny.
- You can also customize Stickers later. Go to the Stickers pane using your keyboard (I usually open the Messages app) and tap the animated Stickers icon in the bottom right. Then, press and hold the Stickers you want to customize, tap Add Effect (or Edit Effect if one has already been applied), and tap Done.
Send Stickers with messages
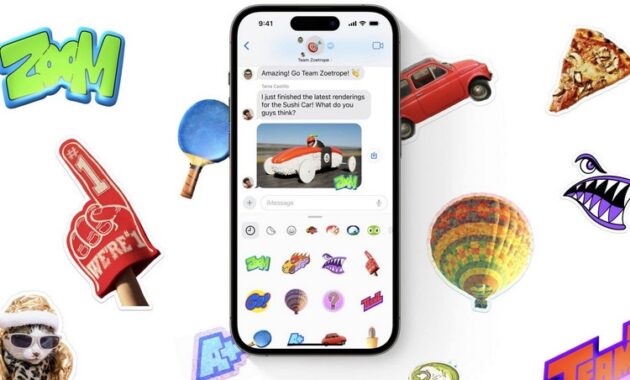
Once you create Stickers, the fun begins: using them in text messages. It's as simple as sending an emoji or Memoji. You can access the Stickers pane on iPhone, iPad, and Mac (as long as you're running macOS Sonoma). Whenever you create new Stickers, they will also sync across all your devices.
How to send Stickers on iPhone or iPad:
- Open a text window with Messages.
- Tap the Emoji icon.
- On the left side, you will see your frequently used Stickers. Tap the Stickers you want and it will appear in the Message text box. Then, press send.
- To access your entire Stickers pane, tap the Stickers icon in the bottom right. From there, you can scroll down to see all your Stickers. When you find the one you want, tap it and it will appear in the text box. Then, press send.
How to send Stickers on Mac:
- Open a text window with Messages.
- Click App Drawer and click Stickers.
- Click on the Stickers you want to use and press send.
Like emoji and Memoji, you can hold and drag Stickers to apply to individual message bubbles in a thread (with iOS 17.2). All you have to do is open the Stickers pane, press and hold a specific Sticker, drag it towards the text and release. It will then appear in the exact location you placed it. You can also apply multiple Stickers to a text message.
Organize your Stickers drawer
After accumulating a lot of Stickers, you can organize your Stickers drawer. You will have the option to rearrange the order of Stickers and delete Stickers you no longer use.
- To reorder your Stickers:
- Open the Stickers pane on your iPhone or iPad and tap the Stickers icon.
- Long press on any Stickers and tap Rearrange.
- Press and hold Stickers and drag it to the preferred location.
To remove Stickers:
- Open the Stickers pane on your iPhone or iPad and tap the Stickers icon.
- Press and hold the Delete key.
You can also delete Stickers while rearranging them by tapping the “–” button to the left of each Sticker. Another method is to tap the “+” icon to the left of the Messages text box, find the Stickers app, and tap it. Once your Stickers pane is open, long press on a specific Sticker and tap Delete.
And if you're looking for inspiration on where to find funny and quirky images to create Stickers, I highly recommend scrolling through social media like X, TikTok, or wherever else you have can find funny content. That's where I continue to find my funniest Stickers.
Leave a Reply